How to Drill Tiles
Congrats on your beautifully finished tiling project – a job well done! Now, it’s time to add those final touches, like bathroom accessories or shelves. You might be nervous about drilling into your pristine tiles but don’t worry. At Cheap Tiles Online, we’ve got your back.
We’ve crafted this simple guide to help you master the art of drilling tiles without causing any cracks. Let’s get started.
What do you need to drill your tiles?
- Carbide-tipped drill bit
- Diamond-tipped drill bit
- Drill
- Masonry drill bit
- Masking tape
- Pencil / Tile marker
- Tape measure
- Wet sponge
- Wood drill bit
- Wooden block
Step-by-Step Guide on how to drill tiles
Now that we’ve got our tools ready, roll up your sleeves and get to work. We’ll be going through the process step-by-step, ensuring that your tiles remain intact and beautiful.
Step 1: Identify Your Tile Type
Before you dive into drilling, take a moment to familiarise yourself with your tile. Is it porcelain or natural stone? These tiles are harder than ceramic tile options and will need a bit more elbow grease and a specially designed tile drill bit to break through.
Step 2: Prepare the Right Tools
Ready to start drilling? Not so fast. First, we need the right set of tools. A power drill is essential, but the real star of the show is the drill bit. Ditch any old or tired bits, as they could harm you and your tile. Safety first – grab some goggles, a dust mask, and safety gloves.
Remember, tiles are tough. Regular or masonry bits won’t do the trick. You’ll need either a carbide-tipped or diamond-tipped drill bit. Diamond-tipped ones are a bit pricier but can handle even the hardest tiles without breaking a sweat.
Carbide-tipped bits are more common, perfect for a non-glazed or glazed ceramic tile but not quite up to scratch for harder materials like quarry or porcelain tiles. When drilling holes through those types of tiles, stick with diamond-tipped drill bits, as they are perfect even on the hardest tile surfaces.
Step 3: Double-check measurements and Mark Your Drilling Area
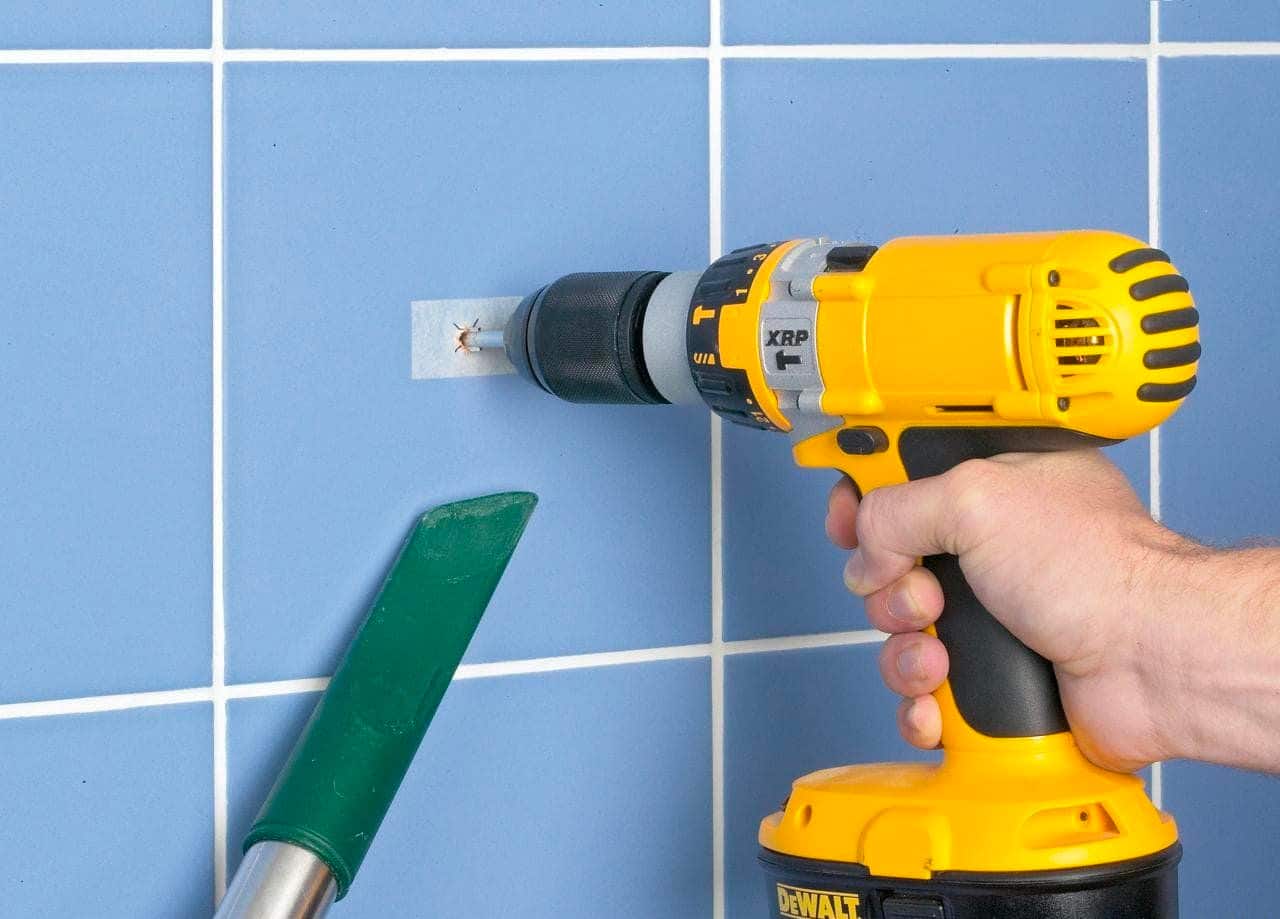
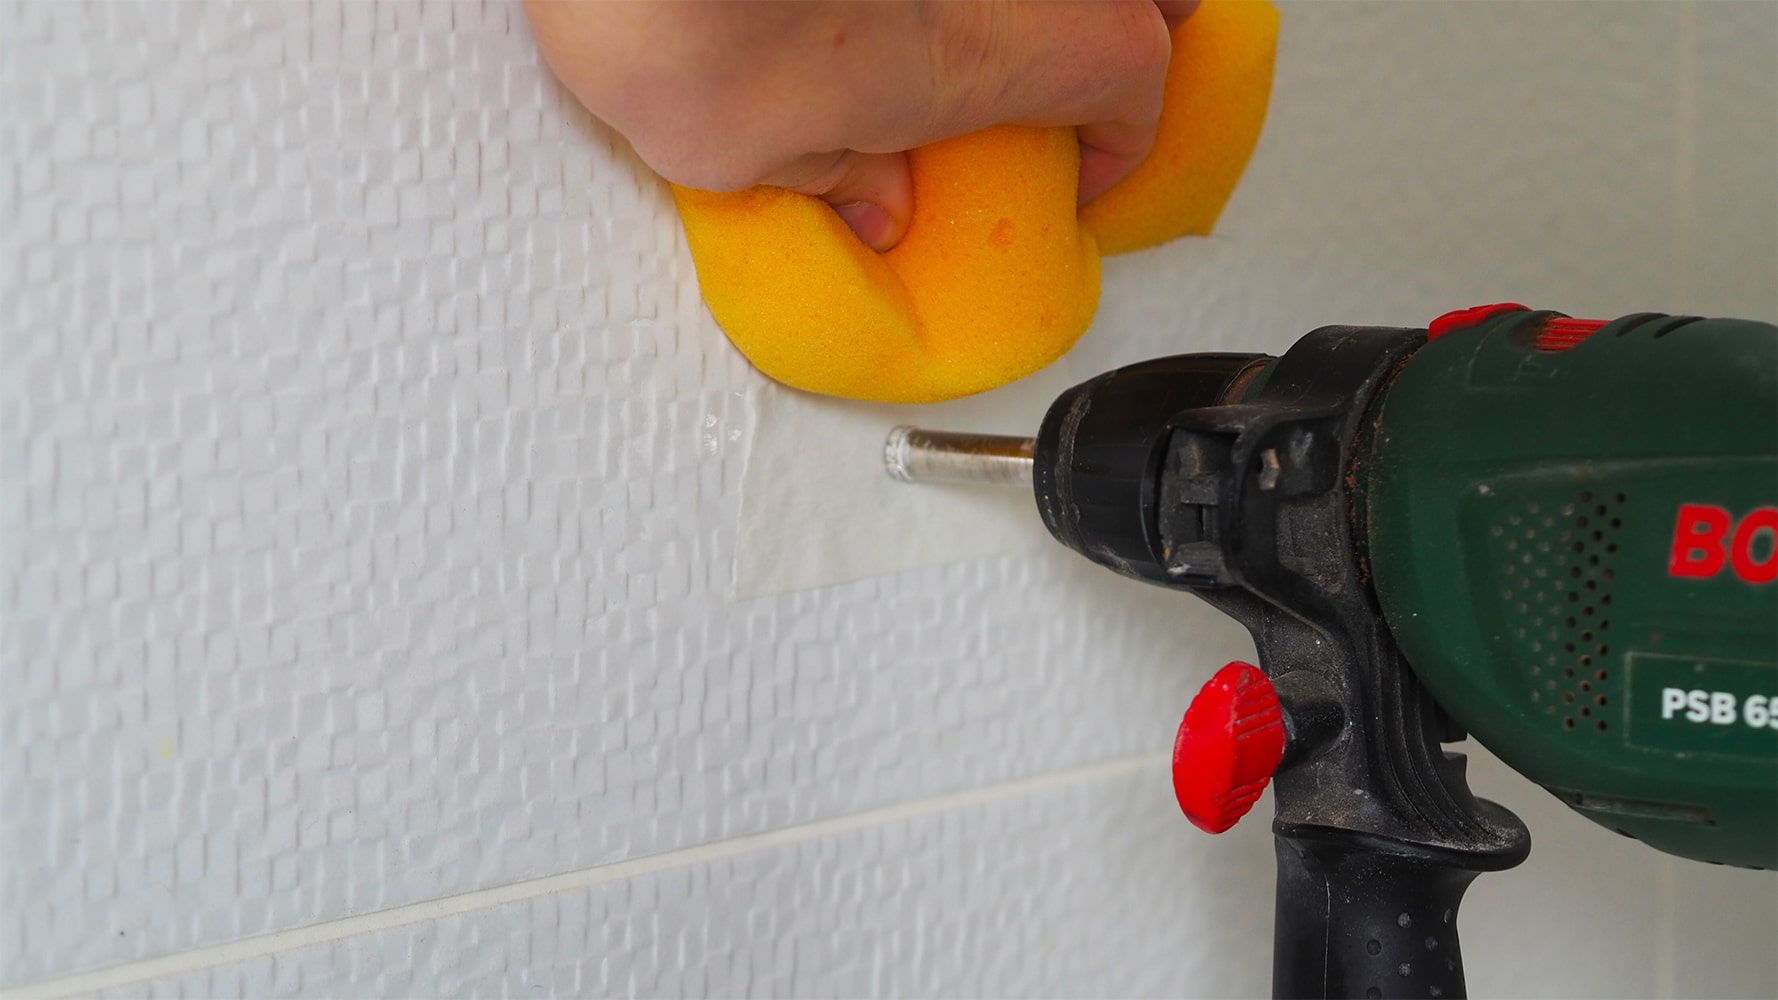
Tiles can be slippery little things when it comes to drilling. To stop your drill bit from doing the slide, pop some masking tape over the spot you plan to drill into. Double-check your measurements – accuracy is key here – and mark an ‘X’ on the tape. This gives your drill bit something to grip on.
If you’ve got multiple holes to drill, a small block of wood can be your best friend. Drill a hole into it that matches your drill bit’s diameter, then place it over your tile as a guide. Hold the block steady with your free hand while you drill.
For those who love precision, consider getting a drill guide. They come in different styles – some attach to the tile with a suction cup, and others are steel plates with guide holes. They might cost you a bit initially, but they’re a great investment for DIY enthusiasts, and you can use them again and again.
Step 4: Begin the Drilling Process
With all your preparations and tools ready, it’s time to get drilling. Tiles, especially porcelain and natural stone ones, are tough. So, patience is key.
Don’t drill through tile right away; it can make your drill bit too hot and cause unwanted vibrations that might crack the tile. Drill slowly, applying steady pressure until you’ve cracked the top glaze layer.
Once you’re through that, you can gradually pick up the pace and apply a bit more pressure to break through the tile into the wall. When you hit the wall, again, drill slow and steady to avoid any damage.
Step 5: Keep Your Drill Bit Cool
The secret to successful tile drilling? Keeping your drill bits cool. And it’s as easy as using some water. Just dampen a sponge and give your bit a little dab now and then to cool it off.
You can also hold a wet sponge under the drill bit while it’s working. This not only stops your bit from overheating but also catches any dust and debris. Just be very careful not to get the drill motor wet.
Diamond bits can handle a bit of heat, but they’ll last longer if you let them cool down periodically. So remember, to keep your drill bits in tip-top shape, don’t overheat them and avoid applying too much pressure.
Step 6: Switch Drill Bits Based on Substrate Material
Once you’ve made it through the tile and hit the wall, it’s a good idea to swap out your drill bit based on what the wall is made of.
If it’s concrete or stone, go for a masonry drill bit. For fiberboard or timber, you’ll need wood bits. If you’re dealing with cement backer boards, which are often found behind tiles in places like showers, you can use a standard drill bit or the one you used for the tile.
It’s not common to find tiles installed on metal, but there might be metal supports behind the wall. If you need to drill into them, a standard high-speed steel (HSS) drill bit should do the trick. But if you’re up against tougher metals like cast iron or stainless steel, opt for a cobalt steel or black oxide drill bit.
What safety steps should I take when drilling tiles?
Safety always comes first. Here’s a quick rundown of three crucial safety tips to remember before you start drilling tiles:
- Wear Protective Gear: Before you get started, gear up with safety goggles, a dust mask, and gloves. They’ll keep your eyes safe from any flying debris, your lungs clear of dust, and your hands-free from any unexpected slips or nicks.
- Manage Equipment Heat: Drilling can heat things up, which could potentially lead to burns. Always have a wet sponge nearby to give your drill bit a cool-down when it needs it. Just be careful not to get any water on the drill motor.
- Maintain a Stable Environment: Tiles can be slick, and drills can slide, which could result in an accident. Always use masking tape to mark where you’re drilling for better grip and stability. If you can, use a drill guide or a wooden block to keep everything accurate and under control during the process.
When is It Time to Call in the Professionals for Help?
Got a tricky tiling project? It’s time to call in the professionals when you’re dealing with large or complex layouts, delicate materials, or if you’re not confident handling tools.
A professional can ensure accurate cuts, proper installation, and safety. Remember, it’s fine to DIY, but for those big or intricate jobs, sometimes it’s best to let the experts take the wheel.
FAQs
What type of drill bit is best for ceramic tiles?
For ceramic tiles, a carbide-tipped masonry drill bit is usually the best choice. They are strong enough to drill through the tile without causing damage. However, for harder materials like porcelain tile or stoneware, a diamond drill bit would be more suitable.
How can I prevent my tiles from cracking when drilling?
To prevent your tiles from cracking when drilling, start with a small pilot hole and work your way up. Apply steady, but not excessive, pressure and keep your drill bit cool with water. Also, using the correct type of drill bit for your tile material can help reduce the risk of cracking.
Is it safe to drill through tiles in a bathroom or kitchen?
Yes, it is safe to drill through tiles in a bathroom or kitchen as long as you take the necessary precautions. Firstly, ensure that you are not drilling near any underlying water pipes or electrical wires. Secondly, use masking tape to prevent the drill from slipping, and finally, wear appropriate safety gear like goggles, a dust mask, and gloves to protect yourself during the process.